


It’s been a busy week – especially as regards the gathering of supplies for the coop, which I am trying to get done just in case the Coonman decrees a resumption of Sickness Kabuki as the price of admission to Home Depot and other stores. As is well-known, I am not a “practicer” of these sick rituals and worry about being barred from buying on account of that.
One more load – this time, of siding – and I should have all I need. This time, I’ll use my truck rather than the Miata press car – which can only handle so much and definitely not 4×8 sheets! But it handled 4x4x8 poles pretty well – just one at a time!
Plus a few eight-foot boards.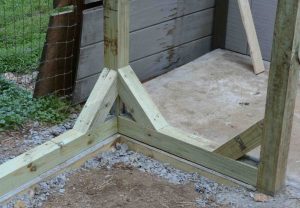
Anyhow, as you can see, the structure is now up. The 4x4s are in and on cement, braced at each junction, the works tied together with two-by-sixes cut to fit. The main thing left to do before the siding (T111 plywood) goes on is to roof the thing, which will be sheetmetal screwed into the two-by-sixes that lace the top. This is the same type of roofing as on my main shed and it serves the purpose of being durable, relatively light and zero maintenance. Metal roofs are usually good (and leak-free) for decades and that ought to get me through whatever is coming, as the formless thing slouches ever closer to Bethlehem (via DC).
My old college buddy, who owns a roofing business, is going to help me with this part. He and his guys do metal roofs every day so I figured I’d draw on his knowledge and experience to get it done faster – and done right. I will post some details about what’s involved in putting up a metal roof in the next installment as I think it may be of interest to some.
Also of possible interest – why I decided to not go with a clear/translucent corrugated roof, which I had been considering. I decided against chiefly because I didn’t have good luck using the same kind of material on the old coop – which leaked. I want this one to be tight – and so do you, if you’re thinking of building a coop. Leaks mean water on the bedding, which becomes a disgusting mess that is hard to clean and which you will be cleaning up, often. It wastes time as well as bedding and it is not good for the birds, who like it dry as much as we do.
The corrugated form of those sheets also leak too much air; one of my goals with this new coop is to make it such that it is well-ventilated in summer – via windows on the sides and two huge barn doors – but conserves heat in the winter, so that it will be easy to keep the interior warm even when it is very cold out. This is important for the health of the birds as well as yours, since it sucks to have to constantly replace frozen-solid water and perform other services – such as putting vaseline on the combs of the birds, to prevent frostbite.
Finally, aesthetically. I wanted the coop’s roof to match my shed’s roof, so that when finished, the two look as though they were made at the same time and intentionally. An afterthought structure looks cheesy on the property and while that may not matter now, to you, consider that it may matter to a future prospective buyer – if you ever decide to sell your place.
So, what’s next?
After the roof, the hanging of the siding and the making (and hanging) of the dual doors, which will also be made of the same T111 siding, braced with with one-by-fours. The works will be painted the same gray (with the trim brown) as my shed, so it all matches. I need to get gravel for the flooring – onto which will go straw bedding – which the ducks seem to like best.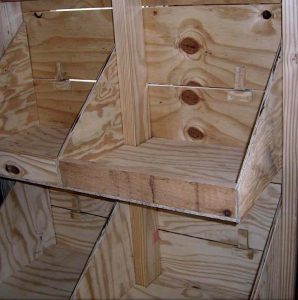
The chickens will get nesting boxes and perches to roost, which I’ll try to get going as a side project while I’m working on the main one. I’m envisioning a row of stacked 1x1x1 nesting boxes built into the back wall, with a “chicken walk” for the birds to use to get up and down. Or they can fly up and into. The ducks’ area will be out of the line of fire (of poop rain) and the birds will be free to enter and exit as they like into the secure small run that will attach to one side. An automatic feeder/watering system will be built to provide their necessaries without the need to refill either daily, which will make life a little easier on me.
Stay tuned for Installment IV!
- Errata: I will not be putting a 4×8 sheet on top; the metal roofing will be screwed onto the 2x6s on the top.
. . .
Got a question about cars, Libertarian politics – or anything else? Click on the “ask Eric” link and send ’em in! Or email me at EPeters952@yahoo.com if the @!** “ask Eric” button doesn’t work!
If you like what you’ve found here please consider supporting EPautos.
We depend on you to keep the wheels turning!
Our donate button is here.
If you prefer not to use PayPal, our mailing address is:
EPautos
721 Hummingbird Lane SE
Copper Hill, VA 24079
PS: Get an EPautos magnet or sticker or coaster in return for a $20 or more one-time donation or a $10 or more monthly recurring donation. (Please be sure to tell us you want a magnet or sticker or coaster – and also, provide an address, so we know where to mail the thing!)
My eBook about car buying (new and used) is also available for your favorite price – free! Click here. If that fails, email me at EPeters952@yahoo.com and I will send you a copy directly!


Looks exquisite and robust, Eric. Can’t wait to see what’s next.
I’m telling you guys your both missing out. The deep liter method is where its at. Now I realize it is best used with a raised off ground coup, and one where the girls get to go out. Ours is like a chicken Taj Mahal. They really only sleep and lay eggs inside though.
It also may be more costly. I go through a bag of pine shavings in a month to month in a half. Every week I go inside, spread some DE around, few handfuls, then some heaping shovelfuls of pine shavings, then more DE. There is no fowl smell. Only from the ground around the outside after torrential rains.
I would say I clean the coup out twice maybe three times a year, the chickens are happy, lay lots of eggs and look better than most other bird flocks around here.
RE: “gravel for the flooring – onto which will go straw bedding”
Why would you use gravel? I can understand – a little – for improved drainage, depending on how deep it is, won’t droppings, dirt and fine straw particles negate that a bit over time?
And, if you ever want to shovel it off, gravel is not so great for that, sometimes, for a loooong time.
I’m asking because I plan on using a hard packed dirt floor, which is not too difficult to shovel/scrape deep litter, such as straw, off of. Wondering if I’m missing something?
Today, I had to un-do some stuff I did on my coop, working with wire mesh is kind of a P.I.T.A. to get just right. The photo on this thread has been my inspiration, ‘The Internet’ always makes things look so easy:
https://www.backyardchickens.com/threads/new-coop-project.1169916/page-2#post-18481208