


Lots of people who aren’t necessarily car people are thinking seriously about getting an old car – not because they want to go to old car shows but because they do not want to have to drive a new car. They want a computer-less car, without “connectivity” and touchscreens that doesn’t have catastrophically expensive-to-fix components, that doesn’t watch their eye movements or correct their driving in the name of “safety.”
Cars like that haven’t been made since the early 1980s, which was when the first primitive computer controls began to appear in mass market cars. You can gut the computer controls those cars were fitted with because they chiefly controlled the last batch of electronically controlled carburetors. Just disconnect all that stuff and use a same-type, non-computer-controlled carb; it’ll bolt right up. In some cases, you may also need to nix the distributor. Then just install a replacement that is a stand-alone unit. The rest of the car didn’t get computer controlled until – roughly – the early 2000s. Today – and since about a decade ago – literally everything is computer controlled, down to the power windows.
Now, if you do get a pre-computer-controlled car with a carburetor and a stand-alone distributor that is similarly not controlled by a computer, you’ll need to learn how to do a couple of simple things that cost nothing to keep things going because all they are are adjustments. No replacements.
You won’t need to “pair” anything, either.
You will need a few very basic hand tools, such as a selection of flat-blade and Phillips head screwdrivers (for making carburetor adjustments) and an offset wrench to loosen (and re-tighten) the bolt that holds the distributor in place. Plus an ignition timing gun – to check the timing and make sure you adjusted it correctly.
Carburetor –
You will have to adjust the idle mixture and idle speed. This has to be re-done every so often because – with carburetors – things sometimes need re-adjusting.
This is done by turning in (and out) the idle mixture screws to achieve the best idle quality (indicating the mix is about right). Usually, turning in the screws (there may be just one if the carburetor isn’t a multi-barrel carburetor) will lean out the mix while turning the screws out will result in a richer mix. The usual procedure is to seat the screws – meaning, turn them all the way in, until they lightly bottom out – and then carefully turn them out the number of turns prescribed by the shop manual. You will want to get one of these for your old analog car and the great news is they are readily available in hard copy format; no QR codes or computer crap here, either! Some fine adjusting of the in/out will be involved to get the best idle quality. You may also have to turn in/out the screw that increases/decreases the idle seed to get the correct idle RPM.
Note that this is all simple mechanical stuff that anyone who can turn a screwdriver can do. Just follow the shop manual instructions.
You may also have to adjust the choke – which is a mechanical door on top of the carburetor that snaps shut when the engine is cold, to temporarily richen up the air-fuel mix when the engine is cold, to assist starting. The choke is usually set by pushing down on the gas pedal – which is just that in analog cars (as opposed to an accelerator pedal, as in modern cars). When you push down on the gas pedal, you are closing the choke and causing a shot of gas to be squirted into the carburetor. Sometimes, it is necessary to adjust the choke linkage to get the choke to fully close – or open in a timely manner after the engine has warmed up enough to not need a richer air-fuel mix.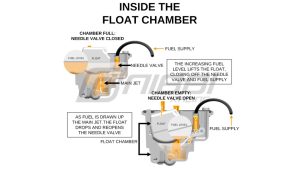
None of this costs you a cent.
If the carburetor is not original to the vehicle – or if you have modified the engine to make more power – you may need to install richer jets, which are screw-in/screw-out little plugs with small holes in them. The size of the hole determines how much fuel flows. You may also have to set the float, which is a thing that is almost exactly like the float in the tank of your toilet. It has to be set right to prevent too much fuel from entering the bowl – which is just what it sounds like – or too little. These two things – installing jets and setting the float level – are a little more advanced but not difficult to do and cost next to nothing other than your time and patience.
Distributor – 
In modern, computer-controlled cars, the ignition timing is controlled by the computer. In analog cars, it’s controlled by the orientation of the distributor. Rotate it a little one way and the timing increases – you’ll be able to see this by pointing your timing gun at the degreed marker on the crank pulley, which all analog-era engines have – or turn it the other way to decrease it. The shop manual – or a sticker under the hood – will tell you how many degrees is right. You use the offset wrench mentioned earlier to loosen the bolt tat secures the hold-down clamp, so you can turn the distributor. Use the wrench to tighten the bolt that secures the hold down clamp when you’ve got it timed right.
You may, if the distributor isn’t the factory unit, have to adjust the curve, which is done via a set of weights and springs. You typically buy a set that is designed to work within the range of whatever is generally right for the engine you’re working on. Beyond that – and once set up and running properly – the only stuff you’ll maybe someday have to futz with is the coil (some are integral, as for instance GM HEI ignitions) and some are external and of course plugs wires and spark plugs. Analog cars go through spark plugs faster because their air-fuel ratio is not always exactly right, as it is with computer-controlled, fuel-injected cars. You might need to replace the plugs once every 30,000 miles or so as opposed to once every 100,000 miles. But plugs are cheap and easy to replace, requiring just basic hand tools and your time and patience.
You may have noticed a theme.
. . .
If you like what you’ve found here please consider supporting EPautos.
We depend on you to keep the wheels turning!
Our donate button is here.
If you prefer not to use PayPal, our mailing address is: EPautos 721 Hummingbird Lane SE Copper Hill, VA 24079